A hardware kit consists of a barcode label printer and label media or a Bluetooth barcode scanner to be paired with a tablet or phone to enhance the barcode scanning experience.
The printer and scanner kits we offer have been tested with Scan IM to ensure proper functionality. We can support you if you have questions using one of our tested kits. You may have other printers or scanners that might work with Scan IM but we won't be able to help you with support in those instances.
Scan IM hardware kits can be purchased from the SK&T website by visiting www.skandt.com/scan-im-hardware-kits/
For additional details see the following articles:
How to program the small button (iPhone/iPad only)
Connecting to Android Device Using BT HID Keyboard
00:00: In this guide, we will walk you through the steps to print barcode labels for your items 00:04: in Scan IM. 00:07: First log into your account then click on subscription and billing from the sidebar 00:11: menu. 00:14: Next you'll need to purchase the barcode printing add-on for a one-time fee 00:18: of 39.95. To purchase this add-on click 00:22: the green add button. If you've already purchased this add-on you 00:26: can skip this step. 00:29: A pop-up window will appear on your screen asking if you wish to continue. 00:33: Click on the green upgrade button to confirm your purchase. 00:38: Next you'll need to configure your barcode settings before printing your first label. 00:43: To do this click on settings from the sidebar menu. 00:48: From here select which size barcode label you'd like to print in. 00:52: In this example, I've selected the two inch by one inch label size. 00:58: Click on update to save your settings. At this time you'll 01:02: want to make sure the driver on your Zebra printer is configured to the label size. 01:06: You'll be printing in. For help configuring your driver. 01:09: Click the pop-up link on the bottom right corner of this video. 01:14: After the driver is configured you can begin printing barcode labels for all 01:18: the inventory items in your Scan IM app. 01:22: Next click on items from the sidebar menu and locate the item you'd 01:26: like to print a barcode label for 01:29: Then select the item from your inventory list. 01:33: Lastly click on print barcode to begin printing the barcode label. 01:48: For more tips and tricks visit scan-im.com/resources.
Scan IM supports barcode printing in two different label sizes: 2"x 1" and 1.25" x 1". These labels can be printed directly in the app for any item in your inventory database.
Before you begin printing barcode labels from Scan IM, you must purchase the barcode printing add on for a one-time fee of $39.95.
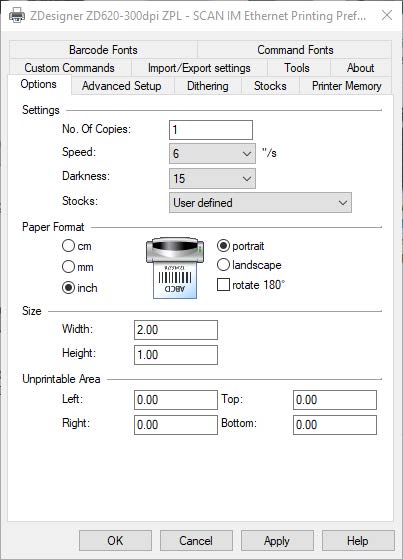
Next, configure your barcode printer to the appropriate settings for the label size you wish to print. To buy a printer that works with Scan IM, please visit the Scan IM Hardware Kits page on the SK&T website to complete your purchase.

Before you print your labels, make sure your barcode settings in the Scan IM app are set to the correct label size.
Lastly, print your labels directly from Scan IM.
Windows Users: Ctrl + p.
Mac Users: ⌘ + p.
 Pricing
 Inventory Management
 Inventory Alerts
 Getting Started
Upgrade Expires In:

